If you’re reading this article you’ve probably heard of the many benefits of using Infrastructure as Code. Using IaC allows us to develop our infrastructure faster, cheaper, and more consistently. What’s not to love about that?
It gets even better though! With cultural shifts like GitOps and DevOps, we can sweep the days of “ClickOps” aside. With these revolutionary practices we are able to not only avoid making changes in the console but establish a workflow that promotes increased operational efficiency.
In this tutorial I will be walking you through creating a GitLab CICD pipeline and using Terraform as our IaC tool.
If you’re anything like me and you love infrastructure and automating everything you can get your hands on, this article is for you.
What is Terraform?
Terraform is one of the leading Infrastructure as Code tools on the market today. What makes Terraform so popular is the fact that it is cloud-agnostic meaning that it will work with AWS, Azure, GCP, and other providers. In short, Terraform automates the process of creating the same resources over and over again.
What is GitLab?
GitLab is a platform that provides tools for version control and project collaboration. It offers features for source code management, continuous integration, continuous delivery (CI/CD), issue tracking, code review, and more.
Pre-Requisites
- GitLab account
- Terraform Code (HCL)
- AWS Account
- IDE ( I will be using Cloud 9)
Now that you know what you’re working with and understand what tools you need, let’s get started!
Step 1: Create a Project and Push to GitLab Repository
Like every great team or project, we need to have a legendary name. I’m going to go with “Freedom” as this project will release us from some of the toil that may be involved in a poor production environment.
During your account creation you will be prompted with the following form.
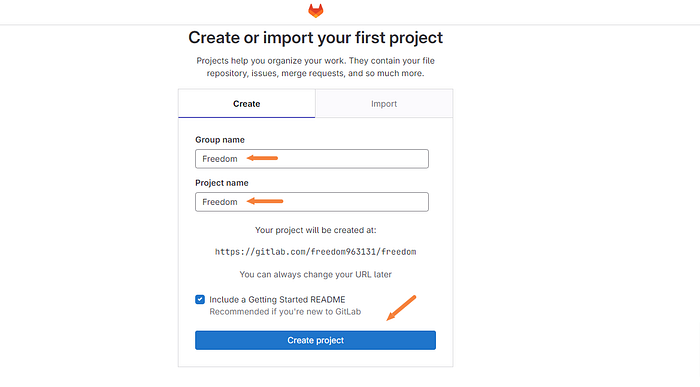
Click “Create project” after you’ve come up with your own legendary name!
Follow the prompts until you arrive at the GitLab landing page.
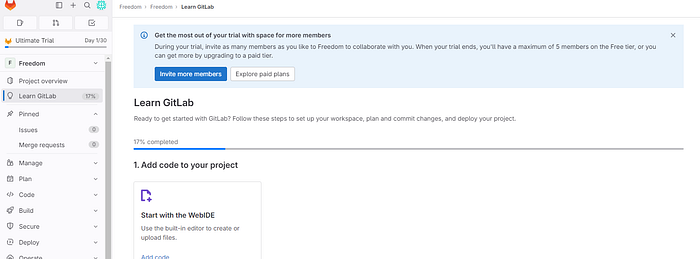
From here, we need to get our code into the GitLab repository.
To do this we will need to initialize the repository on our local machine using git.
Enter the following commands:
git add .
git commit -m "add comment"
To effectively push and pull between our local Git repo and our repo in Gitlab we will need add Gitlab as the remote source.
Enter the following command:
git remote add gitlab <https://github.com/ENTER PROJECT URL
Next, we will upload our existing project into GitLab by pushing it.
Enter the following command:
git push <https://github.com/ENTER PROJECT URL>
Permission denied!
Let’s confirm the repository exists and we have the permissions configured correctly.

The repository has been configured correctly as shown above with the main branch.
Navigate to the “Project overview” tab on the left.

As you can see from the above photo, GitLab is screaming at us to get some authentication methods set up.
Since my last article involved setting up SSH keys with AWS CodeCommit and a local machine we will mix it up a little and configure our authentication using personal access tokens.
At the top left of the Gitlab landing page you will see your avatar. Go ahead and click on the avatar.

Next, click “Edit profile”.

Then access tokens.

Then add new token.

Next, give the token a name, an adequate expiration date, and select the appropriate permissions.
Note: For this demo, I will be granting full permissions. It’s advised to understand the scope of these permissions before doing so in production.
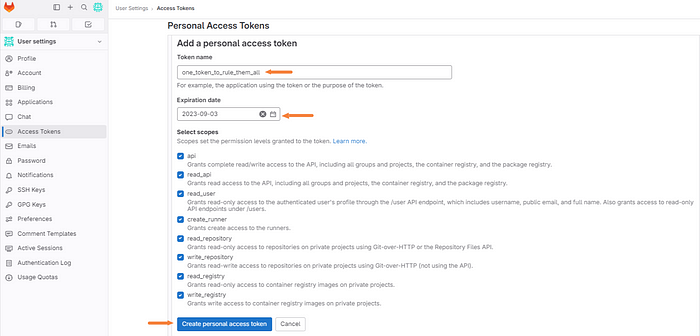
Your personal access token will then be generated. Make sure and save this token somewhere secure as you will not be able to view it again after its initial creation.

Now that we have our personal access token configured we can now push our code into the GitLab repo.
You will be prompted for your username as well as the password. Your username can be found under the account tab on the left and under the change username section as shown below.
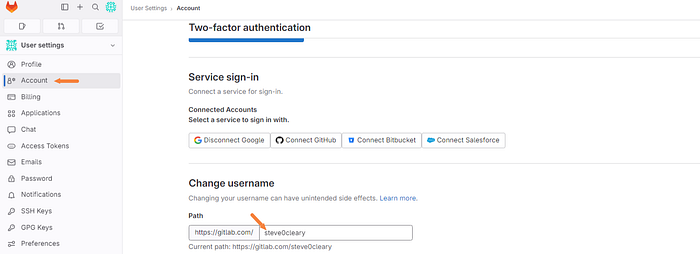
The password will be your personal access token that you just generated moments ago. Hopefully, you saved it! If not, no worries, just create a new one.

Head on over to your projects and select the correct one.

As you can see in the below photo, all the files from our local Git repo have been pushed to the GitLab repo that we just created!
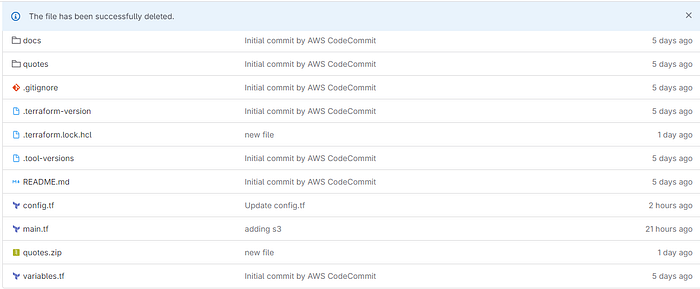
Nice work!
Step 2: Authenticate with AWS
As we will be deploying all of our infrastructure into AWS we will need to pass our access key, secret access key, and our region to GitLab so that it can authenticate with our credentials. If we hardcoded these credentials it would be very easy for someone to obtain.
DO NOT DO THIS!
Instead, set environment variables from within the GitLab platform.
Click the settings drop-down tab.
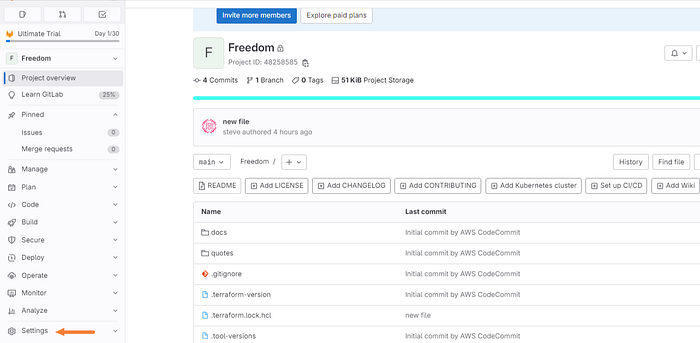
Next, click “CICD” and expand the variables section.
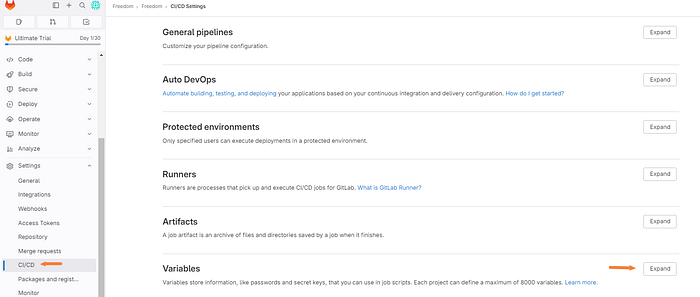
We will be adding three variables below are the keys we will be using.
KEYS VALUES
AWS_ACCESS_KEY_ID <ACCESS KEY ID>
AWS_SECRET_ACCESS_KEY <SECRET ACESS KEY ID>
AWS_DEFAULT_REGION <DEFAULT REGION YOU ARE DEPLOYING TO>
If you are unsure what your values are you will need to create the access keys in AWS IAM. I will walk you through it quickly.
If you already have access keys stored you can skip over this part.
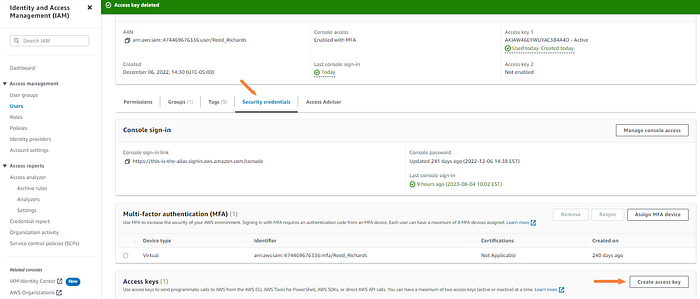
Navigate to the IAM dashboard then select “Users” on the left and click on the user that you want to have access.
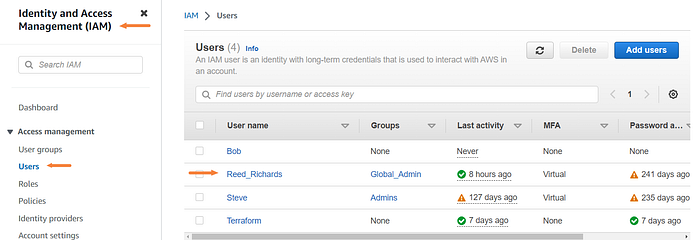
Click the “Security credentials” tab and then Create access key.
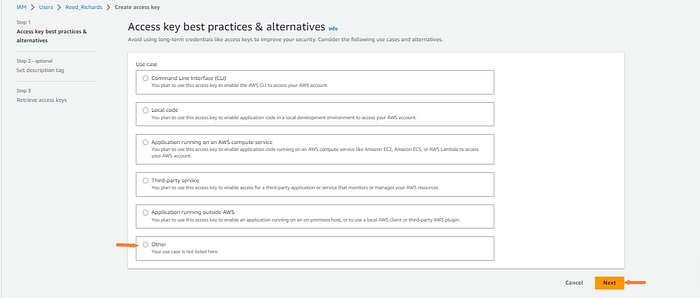
Click other and next.
Enter a description and click “Create access keys”.

On the next page, you will have your keys presented. This will be what you enter into the value section when setting the variables in GitLab.
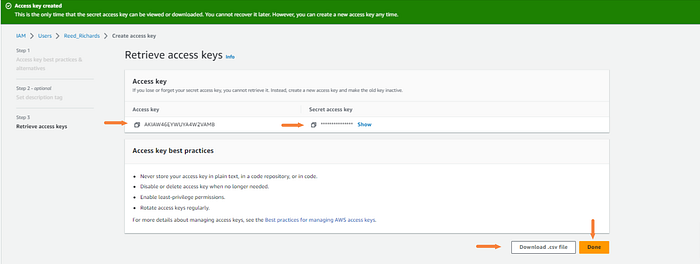
I recommend downloading the .csv file. You will not see the secret access key again once you leave this page.
Alright, back to setting the variables in GitLab.
After you expand the variables section click on add variable.

Then enter the key and the value which you have just created in AWS. Make sure and check the mask variable box as well. Then click add variable.
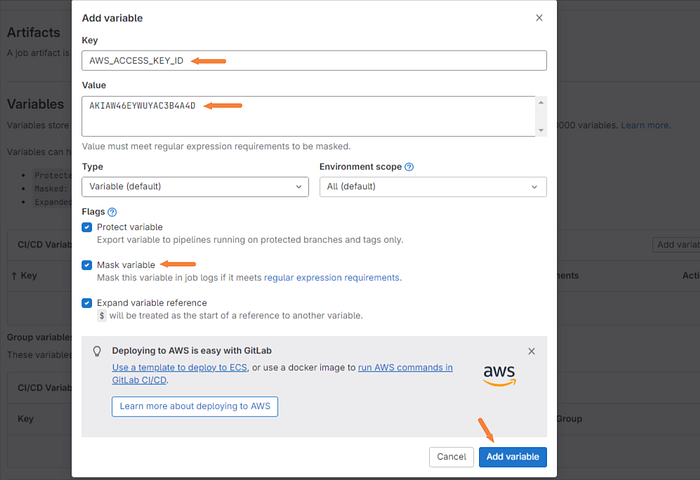
We will repeat this process for the other two variables that we need to set.

Now onto the fun stuff, building out the pipeline! Freedom is upon us!
Step 3: Building out the CICD Pipeline
This section is what we are really here for. We will be building out our CICD pipeline. This will allow us to make infrastructure changes with just a few strokes of the keyboard.
To use GitLab CICD there are two requirements. One of them is to have our application code hosted in a Git Repository. We have already accomplished this when we pushed our code from our local machine into the repository hosted in GitLab.
The other requirement is that we have a .gitlab-ci.yml file located in the root of the repository.
What is a .gitlab-ci.yml file?
Basically, this is a file that contains the work that the pipeline needs to perform. It contains additional configuration files and templates, dependencies, caches, and commands of the code that will be running in the CICD Pipeline.
For example, you might need to make sure that Terraform is installed before running all of the HCL code. Otherwise, it would fail.
Let’s add the .gitlab-ci.yml file to our GitLab repository so we can automate our workflow already!
Click on the “Code” dropdown tab and then click “Repository”. From there we can add a new file to the main branch.
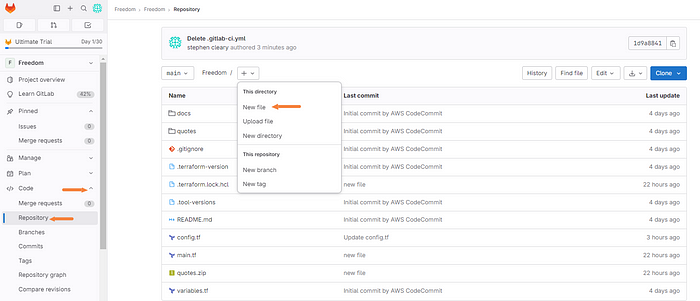
Next, we will add the file and its contents.
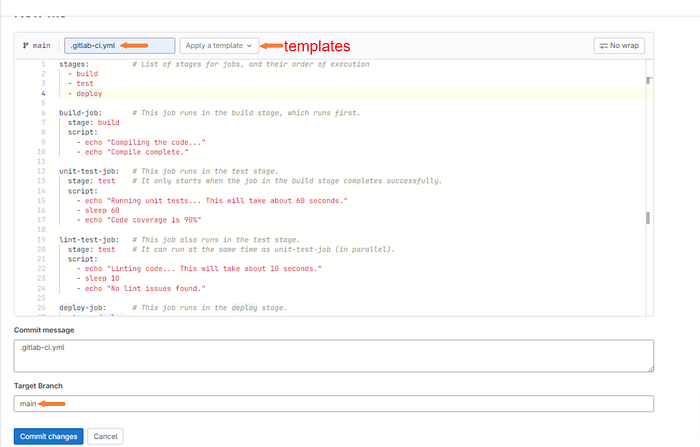
A few things to note here. We need to make sure that the file is exactly .gitlab-ci.yml otherwise it will not work.
There are also templates available to use for your convenience. I personally used a Terraform template here but it didn’t work. You more than likely will need to find your own solutions through trial and error and documentation.
We will be committing directly to main. This is not a great idea in production for obvious reasons. Consider using a branching strategy.
I will leave my code here as well.
stages: # List of stages for jobs, and their order of execution
- build
- test
- deploy
build-job: # This job runs in the build stage, which runs first.
stage: build
script:
- echo "Compiling the code..."
- echo "Compile complete."
unit-test-job: # This job runs in the test stage.
stage: test # It only starts when the job in the build stage completes successfully.
script:
- echo "Running unit tests... This will take about 60 seconds."
- sleep 60
- echo "Code coverage is 90%"
lint-test-job: # This job also runs in the test stage.
stage: test # It can run at the same time as unit-test-job (in parallel).
script:
- echo "Linting code... This will take about 10 seconds."
- sleep 10
- echo "No lint issues found."
deploy-job: # This job runs in the deploy stage.
stage: deploy
script:
- apt-get update -y # Update the package manager (for Debian/Ubuntu)
- apt-get install -y unzip wget # Install necessary tools
- wget https://releases.hashicorp.com/terraform/1.1.0/terraform_1.1.0_linux_amd64.zip
- unzip terraform_1.1.0_linux_amd64.zip
- mv terraform /usr/local/bin/
- terraform init
- export TF_VAR_candidate=stephen
- echo "stephen"
- terraform apply -auto-approve
only:
- main
environment:
name: production
When you are ready click “Commit changes”.

Quickly navigate to the build drop-down tab in your project and click on “Pipelines”. You will see at the top that the pipeline is in fact running.

We can click on the pipeline to further investigate.

Here we can see the different stages of the build being completed or failing.

Let’s go a little bit further and watch the build in action. Click one of the stages I’ll be showing the deploy job.

Now, as you can see, you can actually watch what is being performed.
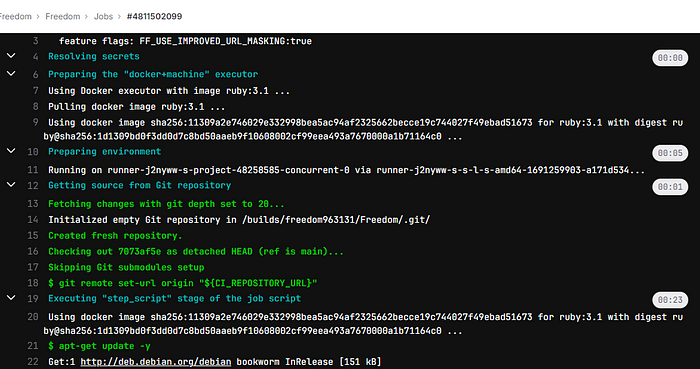
And if all goes correctly….

Job succeeded!
Don’t worry if this doesn’t go as smoothly with your code. This was all trial and error for me. When you finally get this message, you’re gonna be glad you stuck with it and persevered, trust me!
Step 4: Verify in AWS Console
If you’ve worked in IT for any amount of time you’ll know how utterly important it is to verify your work. In this step, we are going to go into the AWS console and make sure that our infrastructure is set up correctly and in working order.
The main purpose of the HCL(Terraform) code was to create an environment that would allow a Lambda function to retrieve a random quote and store it in a DynamoDB table.
Let’s first check to make sure that the Lambda function is working correctly by running a test.
I’ll head over to the Lambda dashboard in AWS.
Click “Functions”.

Select the function.

Then test the function.
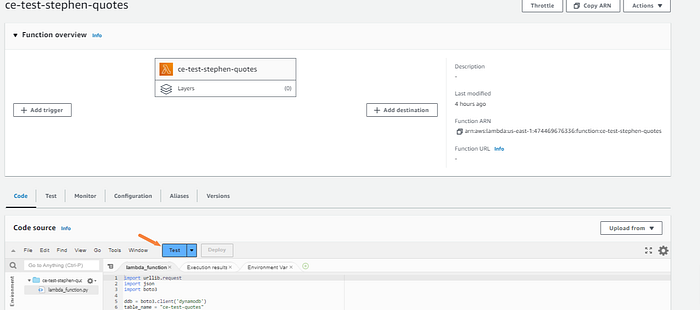
Perfect, we got the response we were looking for.

Now, let’s check the DynamoDB table to make sure that we have the items.
Head to the DynamoDB dashboard.
Select tables.

Click on the appropriate table.

Explore table items.

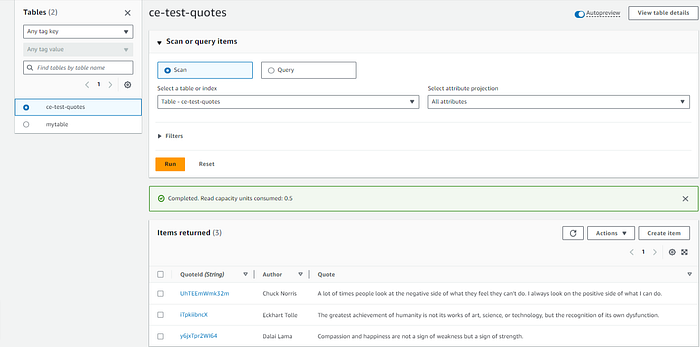
There we have it! A few quotes that we were expecting from the random quote generator.
Step 5: Testing the CICD Pipeline Automation
This whole article has been about gaining freedom by incorporating cultural shifts internally and building automated systems to make our lives easier.
We need to test the repository to make sure that when a developer pushes new code we can trigger the pipeline and intern create resources or whatever changes that are implemented in the commit.
Let’s head back to our local machine make some changes in the main.tf and try to trigger the CICD Pipeline.
We are going to add a new S3 bucket and push it to GitLab.


As you can see, we have a new commit in our repository in GitLab.

However, if we look at our pipeline it’s not running. But why?

GitLab does not run the build straight out of the box there are various methods that you can use to implement the changes that you think are a good fit for your organization.
In the next step, we are going to create a pipeline schedule. This will trigger the pipeline to run at a given time. You can think of it like a cronjob.
Note: You can also trigger pipelines manually or via API methods with GitLab. See the documentation here.
Step 6: Create a Pipeline Schedule
Now, as I mentioned in the previous section there are a few ways that you can automate your pipeline build. In this section, I will be walking you through creating a schedule for your pipeline to run. This will run the pipeline at your specified interval.
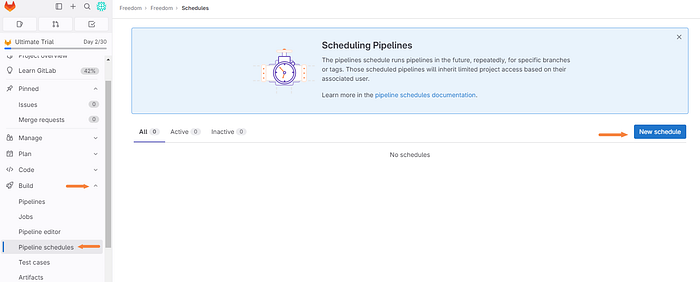
Back in the GitLab UI, click the “Build” drop-down tab and click “Pipeline schedules”.
Then we can proceed by clicking “New Schedule”.
Enter the following information and create the appropriate schedule that works best for you. If you are unfamiliar with cron schedule expressions you can find a calculator here.
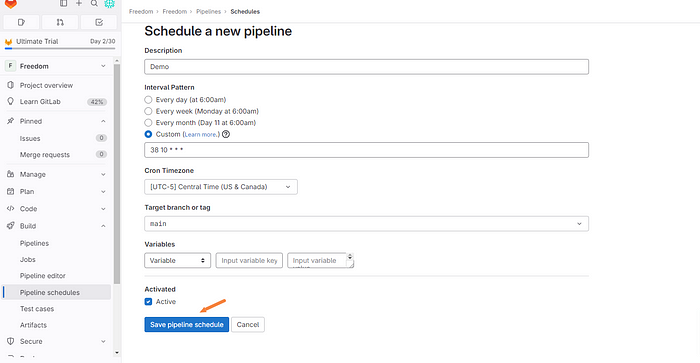
Click “Save pipeline schedule”.

Great! Remember that we have already committed the infrastructure change to the Gitlab repo. If you remember we added an s3 bucket. Now we will wait and see if the job runs successfully and if we have a new s3 bucket in our AWS console.

The pipeline is running as expected, let’s wait and verify it passes.

Everything worked as planned, now the moment of truth. Did the scheduled pipeline create our new s3 bucket?

It sure did!
Now you can see the power of running scheduled jobs and implementing a CICD pipeline. By learning some of these tools you will highly improve your team's life!
Until next time!
Note: Make sure and destroy all infrastructure that you created in AWS.

As always, feel free to join me on this journey of discovery. Whether you come back to this blog, follow me on social media, or reach out to me directly, I would love to continue the conversation and help you learn more about the exciting world of cloud computing.
Thank you for reading, and I look forward to hearing from you soon.


