
Using the Serverless Framework to Deploy Faster, Easier, and More Consistently

I'm ecstatic to be back with another electrifying writeup (pun intended). Today I will be seamlessly walking you through a simple workflow with an HTTP API, a Lambda function, and DynamoDB.
You've been hearing the buzzword "serverless" for years, well now is the time to finally try it out for yourself.
We don't want to just go in the console and configure all of these services; It's 2023 and we strive to build our infrastructure efficiently.
By using modern tools such as the Serverless Framework and Gitlab CI, we can reduce our time to market by releasing changes efficiently, systematically, and with confidence.
Let's take a look at some of the services that we will be working with today!
What is an HTTP API?
An HTTP API communicates between two systems using the HTTP protocol; HTTP APIs make endpoints available as API gateways, allowing HTTP queries to connect to a server. You're using APIs every day you just may not realize it.
What is a Lambda function?
Lambda is a compute service that runs your code in response to events and automatically manages the underlying compute resources for you. These events may include changes in state or an update, such as buying plane tickets online.
What is DynamoDB?
DynamoDB is a fully managed NoSQL database service that provides fast and predictable performance with seamless scalability. DynamoDB allows you to store, retrieve, and update data items in tables. It uses a primary key as a unique identifier for each item in a table, and secondary indexes to provide more flexibility when querying.
What is the Serverless Framework ?
The Serverless Framework is a free open-source web framework written in Node.js and designed specifically for building serverless applications with AWS Lambda. You can now use the Serverless Framework with a wide range of other cloud providers and services allowing you to deploy common resources quickly and efficiently.
What is GitLab?
GitLab is a platform that provides tools for version control and project collaboration offering features for source code management, continuous integration, continuous delivery (CI/CD), issue tracking, code review, and more.
Now that you are all ramped up on some of the services and tools we will be working with let's take a gander at some of the things we will need to be successful in this project.
Project:
- Find a free HTTP API and configure a Lambda Function and a DynamoDB table while utilizing the Serverless Framework
- Use Python to write the Lambda Function and ensure you can capture the data sent to DynamoDB through the HTTP API
- Implement a CICD pipeline and ensure that new pushes automatically trigger and build the services correctly.
Prerequisites:
- An AWS account
- An IDE (I will be using VS Code)
- Basic AWS, Git, GitLab and Python knowledge
- The will and desire to learn and get all the other stuff you don't know or have
Alright, you're officially up to speed. In 3,2,1... Take off!
Step 1: Finding a free API
Obviously we need to get data into our DynamoDB table and what better way to do that other than finding a free API that will give us live data that we can ingest.
I shopped around for quite a bit and I found that Tequila (Kiwi) had a good flight search API that was perfect to use because who doesn't like a good vacation! We will need to sign up for the program then receive an API key so that we can have access to the data.
Head on over to the Tequila website and create and account (Don't worry it's free!)
Once you have the account all set up we are going to need to locate the API key that we will use in our Python code.
Click on My Company and then Create Solution.


Then select One-way and Return and Next.

Enter and name and then click Create.

Your new solution will be created go ahead and click on the solution.
Once there you will see your API key. We will be using this in our Python code at a later point.

Off to a great start! I promise the boring administrational stuff is over.
Step 2: Setting up a project with the Serverless Framework
Now is when the fun really begins and you get to witness the power of the Serverless Framework. To begin we will be making sure that our local machine has Node.js installed. If you don't already have it you can find it here.
Once we are all set up with Node.js we can move over into our IDE in my case VSCode.
I'll be building in my Documents directory feel free to build where you see fit.
We need install a serverless module to get us started.
Enter the following command:
npm install -g serverless
Alrighty, now we will need to get a project started.
Enter the following command:
serverlessYou will be prompted with a list of available projects to choose from. We will obviously be working with the AWS - Python - HTTP API project.

The next prompt will be asking for the name of the project, get creative, have some fun.

The serverless command will prompt you as a new user to do the following.
- Create a new project
- Configure your AWS credentials
- Set up a free Serverless Framework account with additional features
Once you have everything configured lets add the service to your newly created account and organization.
Select create a new app.


You will be prompted with the following.

Enter n. We will deploy this later.
If you look in your directory you will now conveniently see some files that may look familiar.

It created the files for our lambda function, a README.md, a gitignore and the serverless.yml which will deploy our infrastructure.
We need to add a plugin that will take care of some of the pesky dependencies that we may need for our lambda function to work properly.
Enter the following command:
sls plugin install -n serverless-python-requirementsNote: Make sure you are in the projects directory.
Again, we have some more useful files and dependencies created for us.

Great work! Getting closer to deployment!
Step 3: Configure necessary files
In this portion of the tutorial we will be working on getting all of the necessary information into our newly created files. As this tutorial is more about witnessing the power of the Serverless Framework I will provide everything you need to get started. Feel free to experiment on your own.
We will start with our Lambda function. This will be the file named handler.py.
Open the file in your IDE.

You will see sample code as shown above.
Replace it with the following.
import json import boto3 import requests import uuid import datetime from boto3.dynamodb.conditions import Key import os # Initialize the AWS SDK and DynamoDB table dynamodb = boto3.resource('dynamodb') def extract_flight_details(item): flyFrom = item.get('flyFrom', '') flyTo = item.get('flyTo', '') duration = item.get('duration', '') price = item.get('price', '') return { 'flyFrom': flyFrom, 'flyTo': flyTo, 'duration': duration, 'price': price } def query_flight_data(table): try: response = table.scan() items = response['Items'] flight_details = [extract_flight_details(item) for item in items] return { 'statusCode': 200, 'body': { 'message': 'Flight data retrieved successfully', 'data': flight_details } } except Exception as e: return { 'statusCode': 500, 'body': { 'message': 'An error occurred while retrieving flight data', 'error': str(e) } } def lambda_handler(event, context): # Retrieve the DynamoDB table name from the event object dynamodb_table = os.environ.get('DYNAMODB_CUSTOMER_TABLE') # Create a DynamoDB table object table = dynamodb.Table(dynamodb_table) # Check if this is a request to query flight data if event.get('action') == 'query_flight_data': return query_flight_data(table) api_key = '*******ENTER YOUR TEQUILA API KEY********' endpoint = 'https://tequila-api.kiwi.com/v2/search' current_timestamp = datetime.datetime.now().isoformat() params = { 'fly_from': event.get('fly_from', 'ATW'), 'fly_to': event.get('fly_to', 'AUS'), 'date_from': event.get('date_from', '2023-11-16'), 'date_to': event.get('date_to', '2024-01-01'), 'adults': int(event.get('adults', 1)), 'currency': event.get('currency', 'USD'), 'partner_market': event.get('partner_market', 'us'), 'sort': 'price', 'limit': 5 } headers = { 'apikey': api_key, } try: # GET request to the Kiwi.com API response = requests.get(endpoint, params=params, headers=headers) # Check if the request was successful if response.status_code == 200: # Extract flight details from the API response data = response.json() if "data" in data: flight_data = data["data"] flight_details = [extract_flight_details(item) for item in flight_data] if flight_details: # Create formatted flight details list formatted_flight_details = [] for index, flight_detail in enumerate(flight_details): search_id = str(uuid.uuid4()) table.put_item( Item={ 'search_id': search_id, 'fly_from': flight_detail["flyFrom"], 'fly_to': flight_detail["flyTo"], 'duration': flight_detail["duration"], 'price': flight_detail["price"], 'timestamp': current_timestamp, 'item_index': index # Add an index to distinguish between items } ) # Append to formatted_flight_details formatted_flight_details.append({ 'search_id': search_id, 'fly_from': flight_detail["flyFrom"], 'fly_to': flight_detail["flyTo"], 'duration': flight_detail["duration"], 'price': flight_detail["price"], 'timestamp': current_timestamp, 'item_index': index }) return { 'statusCode': 200, 'body': json.dumps({ 'message': 'Flight data retrieved and stored in DynamoDB successfully', 'formatted_flight_details': formatted_flight_details }) } else: return { 'statusCode': 500, 'body': json.dumps({ 'message': 'Failed to extract flight details from the API response', 'formatted_flight_details': [] }) } else: return { 'statusCode': 500, 'body': json.dumps({ 'message': 'No "data" field in API response', 'formatted_flight_details': [] }) } else: return { 'statusCode': response.status_code, 'body': json.dumps({ 'message': f"Request failed with status code: {response.status_code}", 'formatted_flight_details': [] }) } except Exception as e: return { 'statusCode': 500, 'body': json.dumps({ 'message': 'An error occurred', 'error': str(e), 'formatted_flight_details': [] }) }Remember the API key that we created at the beginning of the tutorial? Now is the time! Go ahead and grab your API key and insert it in this line in the code block above.
api_key = '*******ENTER YOUR TEQUILA API KEY********' Then save the changes.
Now we can look at the serverless.yml file which will define your functions, the events that trigger them, and the AWS resources to deploy.
So we need to define our infrastructure as well as the necessary permissions here.
Open the serverless.yml file.
Replace it with the following.
org: steve0cleary app: serverless-onboarding service: aws-python-http-api-project frameworkVersion: '3' provider: name: aws runtime: python3.8 httpApi: cors: true environment: DYNAMODB_CUSTOMER_TABLE: ${self:service}-customerTable-${sls:stage} iam: role: statements: - Effect: 'Allow' Action: - 'dynamodb:PutItem*' - 'dynamodb:Get*' - 'dynamodb:Scan*' - 'dynamodb:UpdateItem' - 'dynamodb:DeleteItem' Resource: arn:aws:dynamodb:${aws:region}:${aws:accountId}:table/${self:service}-customerTable-${sls:stage} functions: kiwi: handler: handler.lambda_handler events: - httpApi: path: / method: get resources: Resources: CustomerTable: Type: AWS::DynamoDB::Table Properties: AttributeDefinitions: - AttributeName: search_id AttributeType: S BillingMode: PAY_PER_REQUEST KeySchema: - AttributeName: search_id KeyType: HASH TableName: ${self:service}-customerTable-${sls:stage} plugins: - serverless-python-requirementsSave the changes.
One more thing!
When we finally push our code to GitLab we won't need the node_modules as shown below:

Add this line to your .gitignore file to keep them from being synced.
*node_modules/*
Then save the changes.
Nice one! Moving forward or sideways, whatever you prefer.
Step 4: Configuring and pushing to GitLab
As I had mentioned in the beginning of this article we will be configuring a CICD pipeline so that our future deployments will be automated and built efficiently.
If you don't have a GitLab account you will need to sign up for one here.
The first thing that we are going to want to do is to create a project.
There will be a sidebar on the left.
- Click the '+' symbol and New project/repository
- Click on the Create a blank project option

You will be prompted with the following as shown below.
- Give your project a name
- Choose the location to create the project
- Make your repo public or private by selecting the correct box in the visibility selection
- Uncheck the Initialize repository with a README box

Perfect. You will then be prompted with the following page.
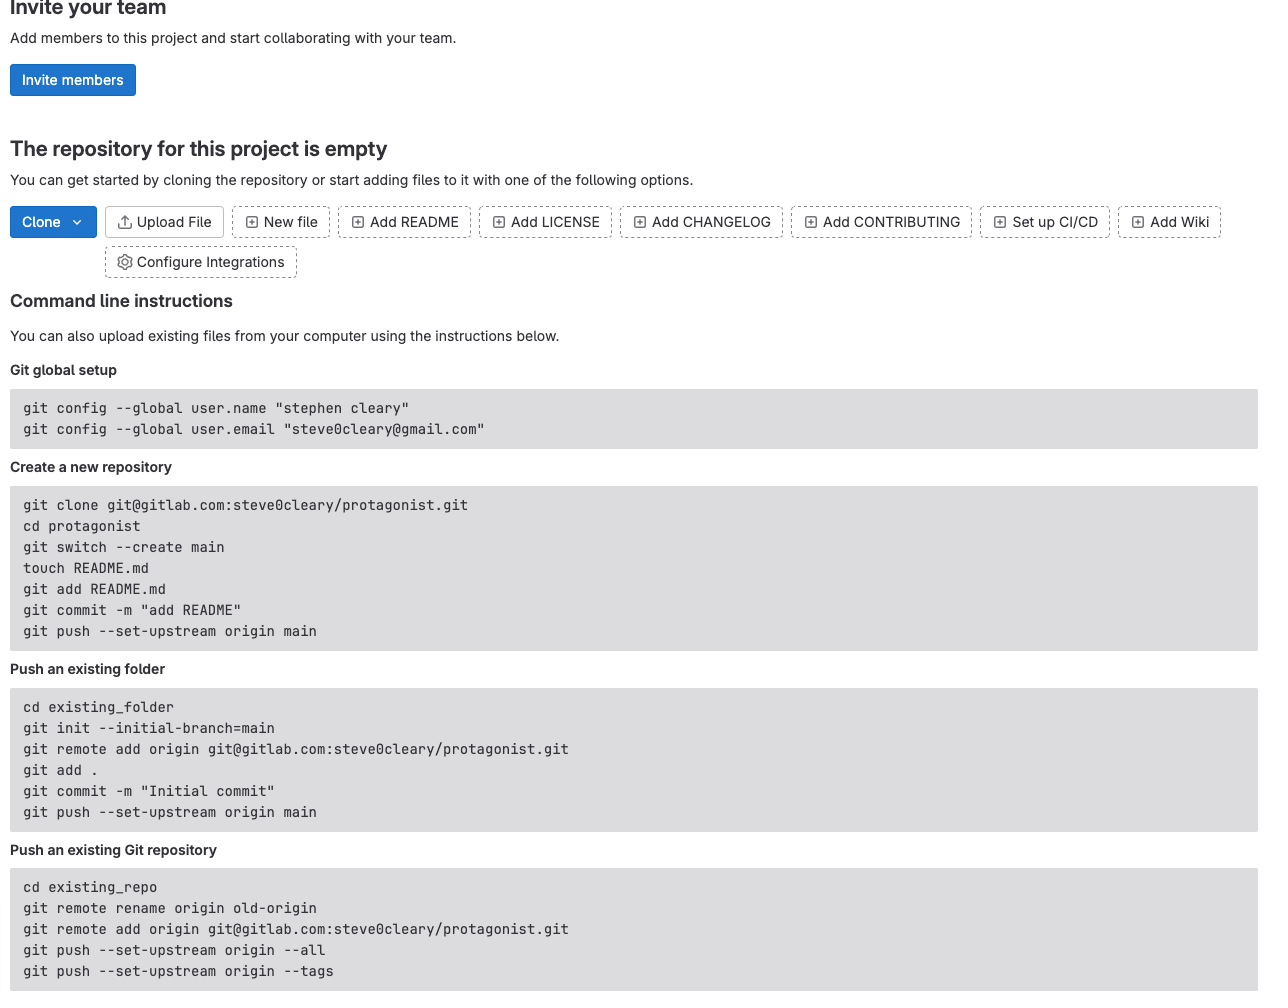
We will first need to configure our access tokens however before we can move forward.
Over to the left on your sidebar make sure you are in the correct project. Click 'Settings' then 'Access Tokens' as shown below.

On the next page click Add a new token.

Next, give the token a name, an adequate expiration date, and select the appropriate permissions.
Note: For this demo, I will be granting full permissions. It's advised to understand the scope of these permissions before doing so in production.

You'll be prompted with your access code. Take a sneak peak and make sure to save it somewhere safe, we will be using it shortly.
Note: You won't be able to access this again. If you fail to save it you'll need to follow the steps again.

Navigate back to your IDE we're going to Git it going!
If you don't already have Git installed you'll need to do so here.
Great, let's Git to it. Last one, I promise!
Note: Make sure you are working in the correct directory.
Enter the following commands:
git config --global user.name "your name" git config --global user.email "email@gmail.com" cd git init --initial-branch=main git remote add origin git@gitlab.com:youraccount/project.git git add . git commit -m "Initial commit" git push --set-upstream origin main 

Great, lets take care of one more thing! Our project depends on libraries and other dependencies so well need to create a requirements.txt.
Enter the following commands:
python3 -m venv .venv source .venv/bin/activate pip3 install boto3 requests uuid datetime os pip freeze >> requirements.txt If done correctly you will see that you have a new file created named requirements.txt.

Note: Commands will vary depending on OS and other factors.
Now we need to add the file and push it to out GitLab repo.
Enter the following commands:
git add requirements.txt git commit -m "adding requirements.txt git push --set-upstream origin main 
Step 5: Creating the CICD pipeline
We have all of our necessary files in our repository except for one and probably the most important one. To use GitLab we need to create and configure our .gitlab-ci.yml file.
The gitlab-ci.yml file is holds all of the scripts we want to run, configuration files and templates you want to include, dependencies and caches, whether you want to run the scripts automatically or trigger any of them manually, location to deploy your application to.
It's, well, important!
At your repositories landing page click on Setup CI/CD.

Then click Configure pipeline.

You'll come to this page below:

Remove the YAML and copy and paste what I have provided below in this section:
image: amazonlinux:2 stages: # List of stages for jobs, and their order of execution - build - test - deploy build-job: # This job runs in the build stage, which runs first. stage: build script: - echo "Compiling the code..." - echo "Compile complete." before_script: - yum update -y - yum install gcc-c++ make -y - yum install https://rpm.nodesource.com/pub_16.x/nodistro/repo/nodesource-release-nodistro-1.noarch.rpm -y - yum install nodejs -y --setopt=nodesource-nodejs.module_hotfixes=1 - amazon-linux-extras enable python3.8 - yum install python3.8 -y - npm install - npm install -g serverless deploy-job: # This job runs in the deploy stage. stage: deploy # It only runs when *both* jobs in the test stage complete successfully. environment: production script: - serverless deploy Then commit the changes:

As soon as you commit, the pipeline has started!

If you click on view pipeline we can see the two stages that we have configured in the .gitlab-ci.yml file.

This is going to fail as we don't haven't set our access keys for AWS and Serverless Framework.
We will need to pass our access key, secret access key, our region, and our Serverless access key to GitLab so that it can authenticate with our credentials.
DO NOT HARDCODE ANY CREDENTIALS!
Instead, set environment variables from within the GitLab platform.
Click the settings drop-down tab.

Then select CI/CDand expand the variables section.

Here is where we can add our variables. Click Add variable.

We will be adding three variables. Below are the keys we will be using.
KEYS VALUES AWS_ACCESS_KEY_ID AWS_SECRET_ACCESS_KEY SERVERLESS_ACCESS_KEY If you are unsure what your values are you will need to create the access keys in AWS IAM. I will walk you through it quickly.
If you already have access keys stored you can skip over this part.
Navigate to the IAM dashboard then select Users on the left and click on the user that you want to have access.
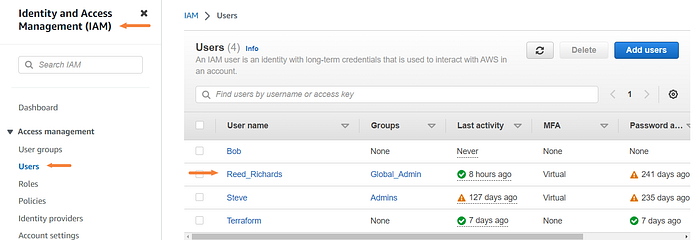
Click the "Security credentials" tab and then Create access key.

Click other and next.

Enter a description and click Create access keys.

On the next page, you will have your keys presented. This will be what you enter into the value section when setting the variables in GitLab.

I recommend downloading the .csv file. You will not see the secret access key again once you leave this page. Alright, back to setting the variables in GitLab.
After you expand the variables section click on Add variable once again:

Then enter the key and the value which you have just created in AWS. Make sure and check the mask variable box as well. Then click Add variable.

Follow the same step for the AWS_SECRET_ACCESS_KEYthen we just need to get the SERVERLESS_ACCESS_KEY from our dashboard and enter it.
Once there click on the gear.

Then select Add .

Give your key a name (anything will do).

You'll be prompted with your access key. Now we need to input that into our GitLab account.

If done correctly you should have three variables for your CICD pipeline to use.

Let's run the pipeline again manually.
From the sidebar click Pipelines and Run Pipeline .

On the next page click "Run pipeline" again.

When the build-job is finished let's take a look at the deploy-job.

Click deploy-job.
Here we can see the deployment live.

And as a wise Frenchman said, "voila".
As you can see the job deployed successfully and here we have our endpoint.
Click on the underlined endpoint.

Here we have the data that we are requesting from the Kiwi Api!
Let's go back to the console to verify that we have deployed the necessary resources.
Step 6: Verify in AWS console
This is were we see the real power of using the Serverless Framework as well as implementing CICD pipeline. When you implement this practice you are not only saving time clicking around in the console you have reusable infrastructure that can be deployed in a matter of minutes.
Head on over to the API Gateway landing page by searching for API Gateway in the AWS management console.

Then select the API Gateway that you created.
Once on your API Gateway page you will see a familiar URL!

Go ahead and invoke the URL by clicking it.

And as the Englishman once said, "ta-da"!
Now let's look at our Lambda Function.

Click on your functions name.
As you can see below we have created our Lambda Function as well as an API gateway.

Great! Let's test our solution.
If you click on the test tab as shown below and create a new test even this will allow us to manually test our function.

Then click the orange test button.
Again, we have the results we are looking for!

Just one last thing to check: If you remember correctly we created a DynamoDB table in our serverless.yml. Let's make sure that we are storing our data as intended.
Navigate to the DynamoDB landing page.
Select tables and then the table that you created.

Click explore table items.
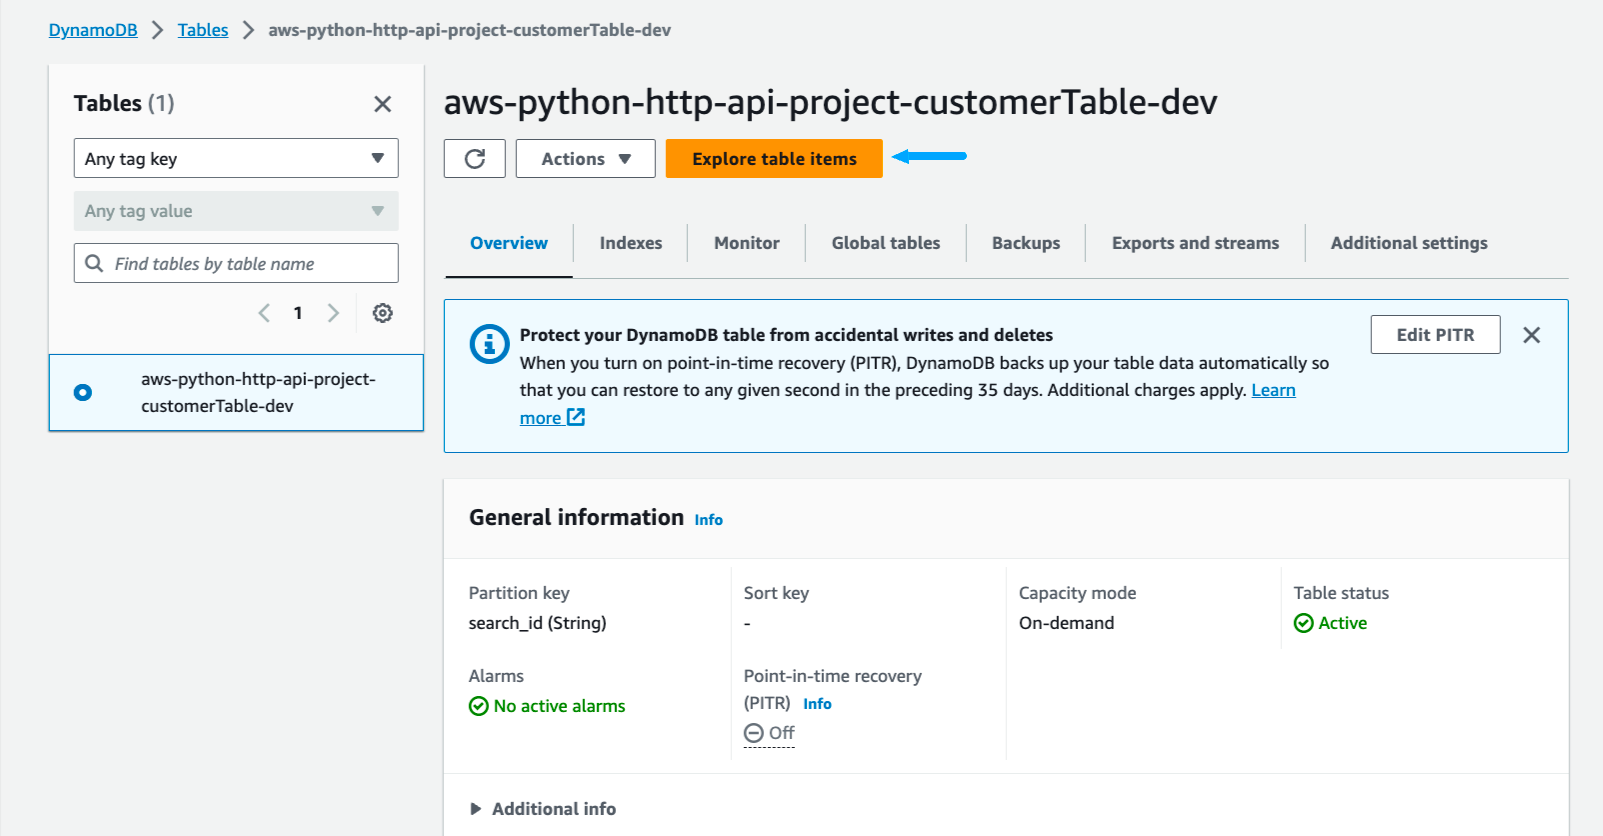
There you should see the data that you have ingested from the Kiwi API.

Now you can see for yourself the benefits of using the Serverless Framework and implementing a CICD pipeline. By utilizing some of these tools you will highly improve your team's life and create business value!
Note: Make sure and destroy all infrastructure that you created in AWS.

As always, feel free to join us on this journey of discovery. Whether you come back to this blog, follow me on social media, or reach out to me directly, I would love to continue the conversation and help you learn more about the exciting world of cloud computing.
Thank you for reading, and I look forward to hearing from you soon!